First appearing in Farming Simulator 19 and now available again for FS22, the Autodrive mod aims to help you automate your entire transport and logistics network related to your farming activities.
In Farming Simulator 22, classic workers can already make deliveries and go to designated fields using the Workers menu. So what makes Autodrive stand out and why is it still absolutely necessary for achieving full automation? We will try to answer them in this guide…
 Developped by Stefan Schlosser before being joined by Axel and Iwan1803, the mod is only compatible for PC/MAC and also works in multiplayer.
The primary goal of Autodrive (AD) could be summed up as follows: to ensure that your workers follow a well-defined path to get from point A to point B efficiently and without hassle. A bit like they were following a rail. Literally, from autonomous driving.
At first sight, this seems little but in reality it is already a lot as the basic workers in the game can quickly find themselves blocked or unable to perform a logical sequence of actions.
If we add to this that Autodrive has priority management (one-way, two-way, secondary lane), advanced detection of vehicles in the open field (for example to empty a threshing machine or follow a forage harvester) and that it can even dialogue with the Courseplay, you will better understand why it brings a significant improvement in the automation of certain tasks.
The advantages of Autodrive compared to conventional workers
Let's start by answering this very legitimate question now that FS22 workers are able to go to the fields and make deliveries on their own thanks to the worker menu.
Do you need Autodrive?
- If you are satisfied with the current operation or automate very little of your agricultural work, the answer is obviously no. Indeed, Autodrive is probably one of the most intimidating mods to learn at the moment, as the settings are numerous and the creation of your road network tedious and sometimes delicate (to be done on each map).
- On the other hand, if you are already quite comfortable with Courseplay and want to go even further to carry out more complex tasks (silage, harvest, supply, multiple deliveries, filling bunker silos), the answer is definitely yes. . Especially since the Courseplay edition 22 will not go as far as its predecessor because it will rely on Autodrive.
Here is a comparison of the operations that can be carried out with Autodrive on one side and the classic FS22 workers on the other.
| auto drive | classic workers |
| Moving to a destination | |
| Choice of destination with search engine and classification by folder. Selection possible from the vehicle.
|
Ditto but without the list of possible destinations with the obligation to create a task via the workers' menu and to point with the mouse to the destination.
|
| Loading from a field A then delivery to a destination B | |
| Setting the "field monitoring" mode directly from the vehicle. In the example below the worker will detect the forage harvester or the threshing machine in field 01 to meet it and once the dumpster is full, will empty it at the farm silo and then return to field 01 and so right now. 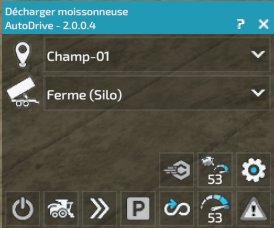 An important difference with conventional workers is that here the AD worker will meet the thresher/forage harvester instead of waiting for her to come and unload herself. An important difference with conventional workers is that here the AD worker will meet the thresher/forage harvester instead of waiting for her to come and unload herself. |
Creation of a task for the worker with choice of the unloading point from a list and choice of the waiting point for manual loading (by positioning it with the mouse) on a field edge. In the example below, the worker will go and wait at the given coordinates in the loading position. Once the dumpster is full, it will empty it at the north railway silo then return to its loading position and so on (loop mode). 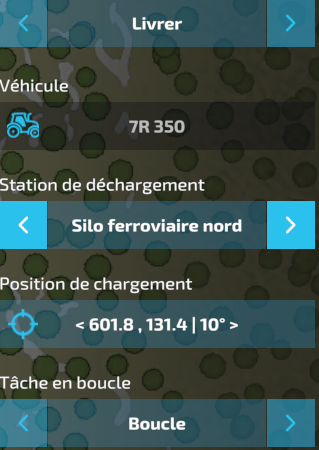 |
| Loading from point A and delivery to point B | |
| Choice from the vehicle of the loading point A, then of the unloading point B as well as the transported material.
Highlight of the Autodrive : This also works from a field. Example: instead of the grain elevator, if you put Field 01 with a loader wagon (for windrows of straw or grass), your worker will be able to follow a Courseplay race in the field and go to empty the loader wagon at the point B specified. |
Functions identical to Autodrive except for the need to create a task from the worker menu.
|
| Unloading/Delivery at point A | |
| Choice of the destination in the list to carry out an unloading.
|
Same operating principle as in delivery A to B but without specifying a loading waiting point.
|
| Movement to point A with resupply from point B | |
| In this mode, the worker will go to point A (and can, for example, carry out the work of the field recorded in the Courseplay) then go to refuel at point B and so on.
|
There is no equivalent because classic workers use the auto-supply option in the game options.
|
| Filling silage silos (corridor and U) | |
| Autodrive detects the presence of bunker silos when you plot a course inside them. There is also reverse gear management.
|
No equivalent among conventional workers |
| Parking of vehicles and tools | |
| Autodrive is able to define parking points for your tools and vehicles to be able to automatically store them at the end of work. Note, it does not unhitch the tools on its own, however, it will wait for a manual action from you. Example below with a designated parking lot for the plow tool 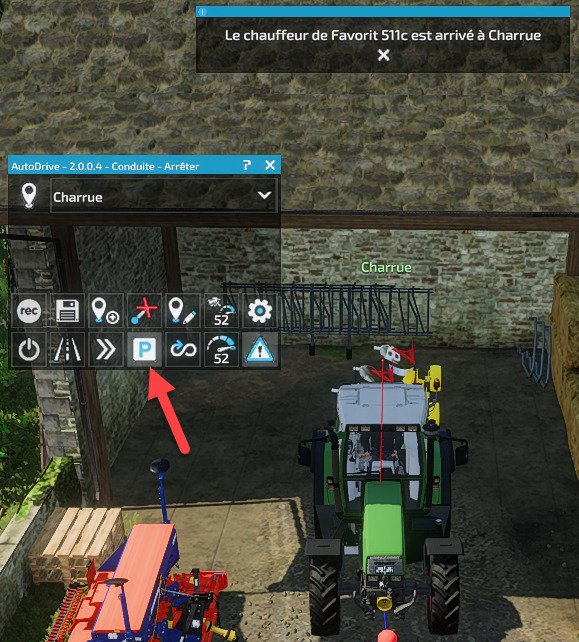 |
No equivalent among conventional workers |
The different AutoDrive modes
They are all selectable from the HUD with the same button which will change icons to indicate the current mode.
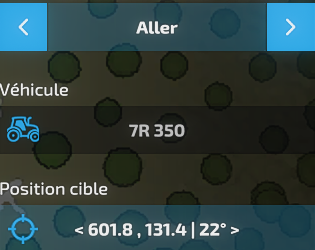
1. Driving 
In this mode, the vehicle will either steer towards the most appropriate point (according to its current direction and distance) or simply the nearest one, then automatically calculate the shortest path between this point and the selected destination in order to get there by autonomous driving. This is the easiest and best mode for testing your new routes.
2. Delivery 
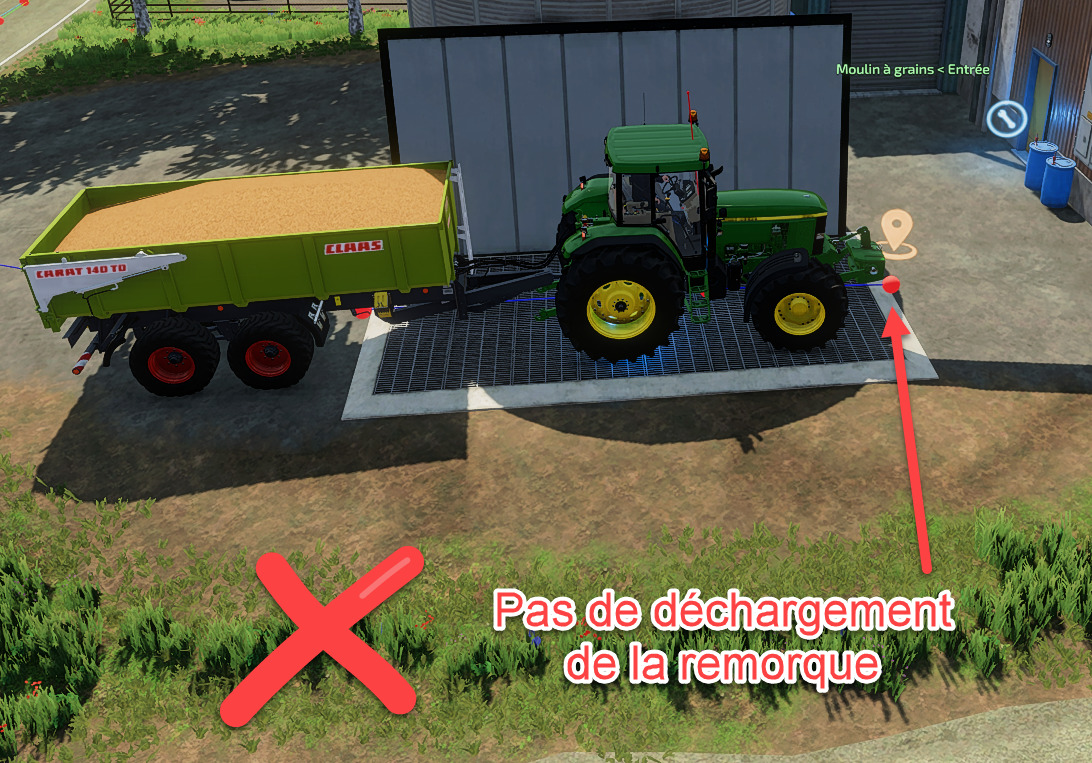
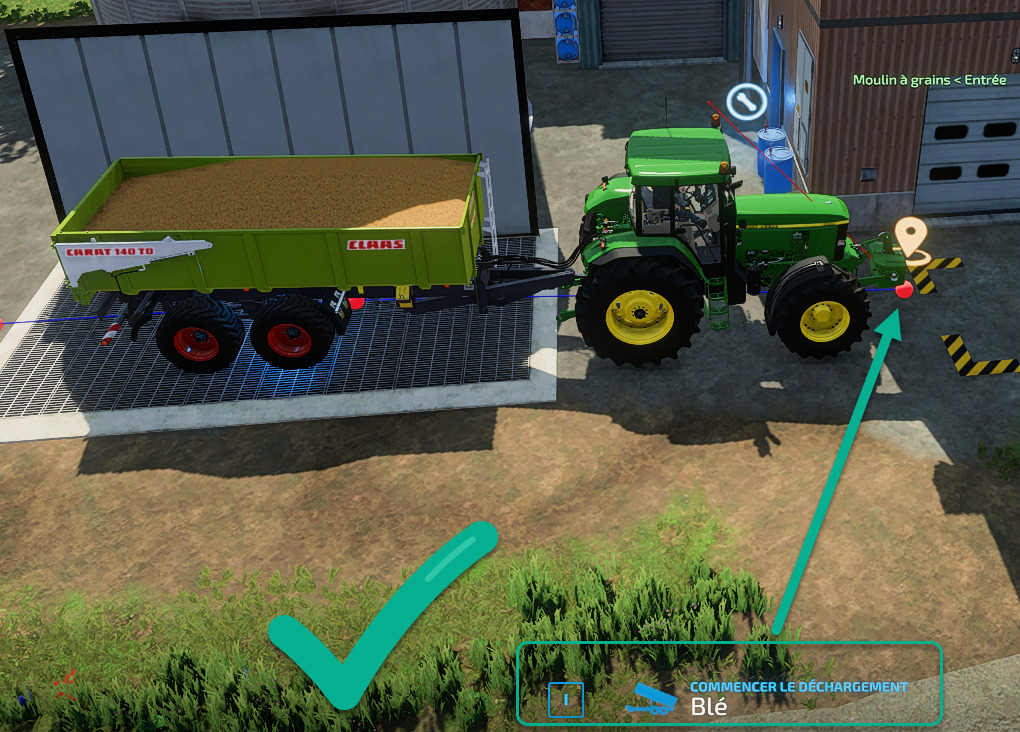
In this mode, AutoDrive will drive the vehicle as in Drive mode except it will unload if it detects an unloading area in close proximity to the destination point.
The destination point should be created slightly further than the unloading area to account for the length of the trailers so that the vehicle does not stop before the trailer itself is in the unloading area.
The driver will stop at the destination whether the trailer is empty or not. If you notice that your destination point is not far enough away, you can easily move the point in edit mode with a right click and hold on it to move it.
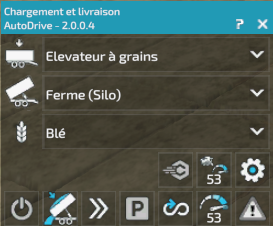
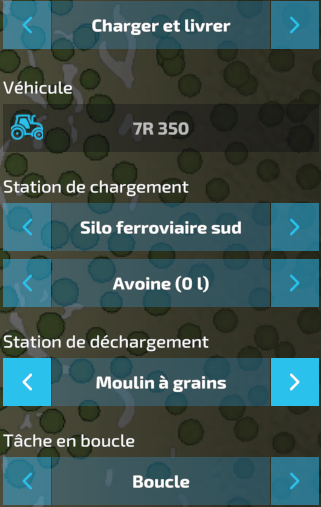
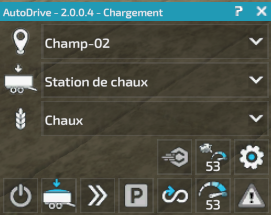
3. Loading and delivery 
 In this mode, you must select 2 target destinations: the 1st is for loading and the 2nd for unloading. You must also select the goods to be loaded.
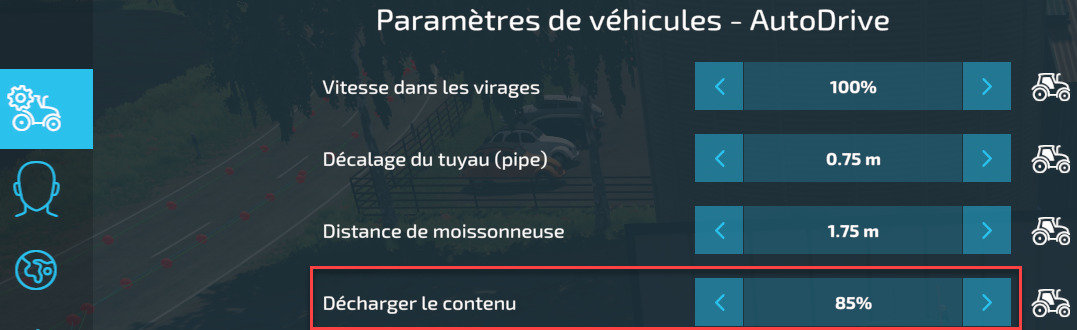
If AutoDrive is activated, it examines the current fill level of connected trailers/devices. If this value is higher than the “Unloading at” level (see illustrations below), the driver goes directly to the delivery destination.
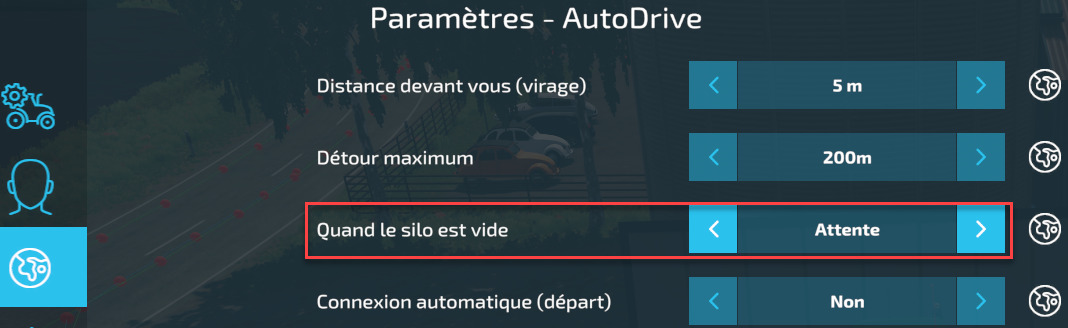
Otherwise, it will head to the loading destination first. Depending on the option chosen in the 'When silo is empty' parameter (see illustration below), the driver will either wait at the loading destination until the fill level exceeds the level of 'Unload contents' or he will continue to the unloading destination.
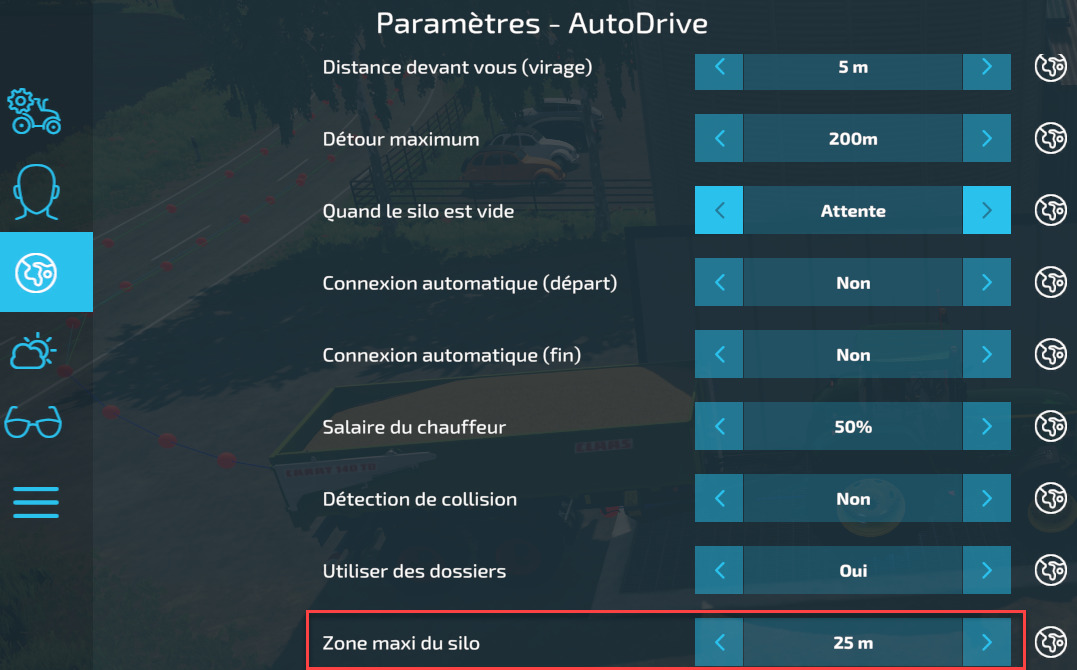
In all cases, the driver will first try to load the selected cargo type on any available trigger within a range just before the loading destination point (see illustration below). You can also choose the amount of loops to complete before starting the ride.
If you set this counter to 2, the driver will stop after reaching the unloading destination 2 times. By default, loop mode is set to infinite.
3.1 Coupling with courseplay (CP)
There are two steps to perform in the order you want so that your driver can work in a field following the courseplay and then can unload following an Autodrive route and return to the field to continue his work.
Creation or loading of the CP run
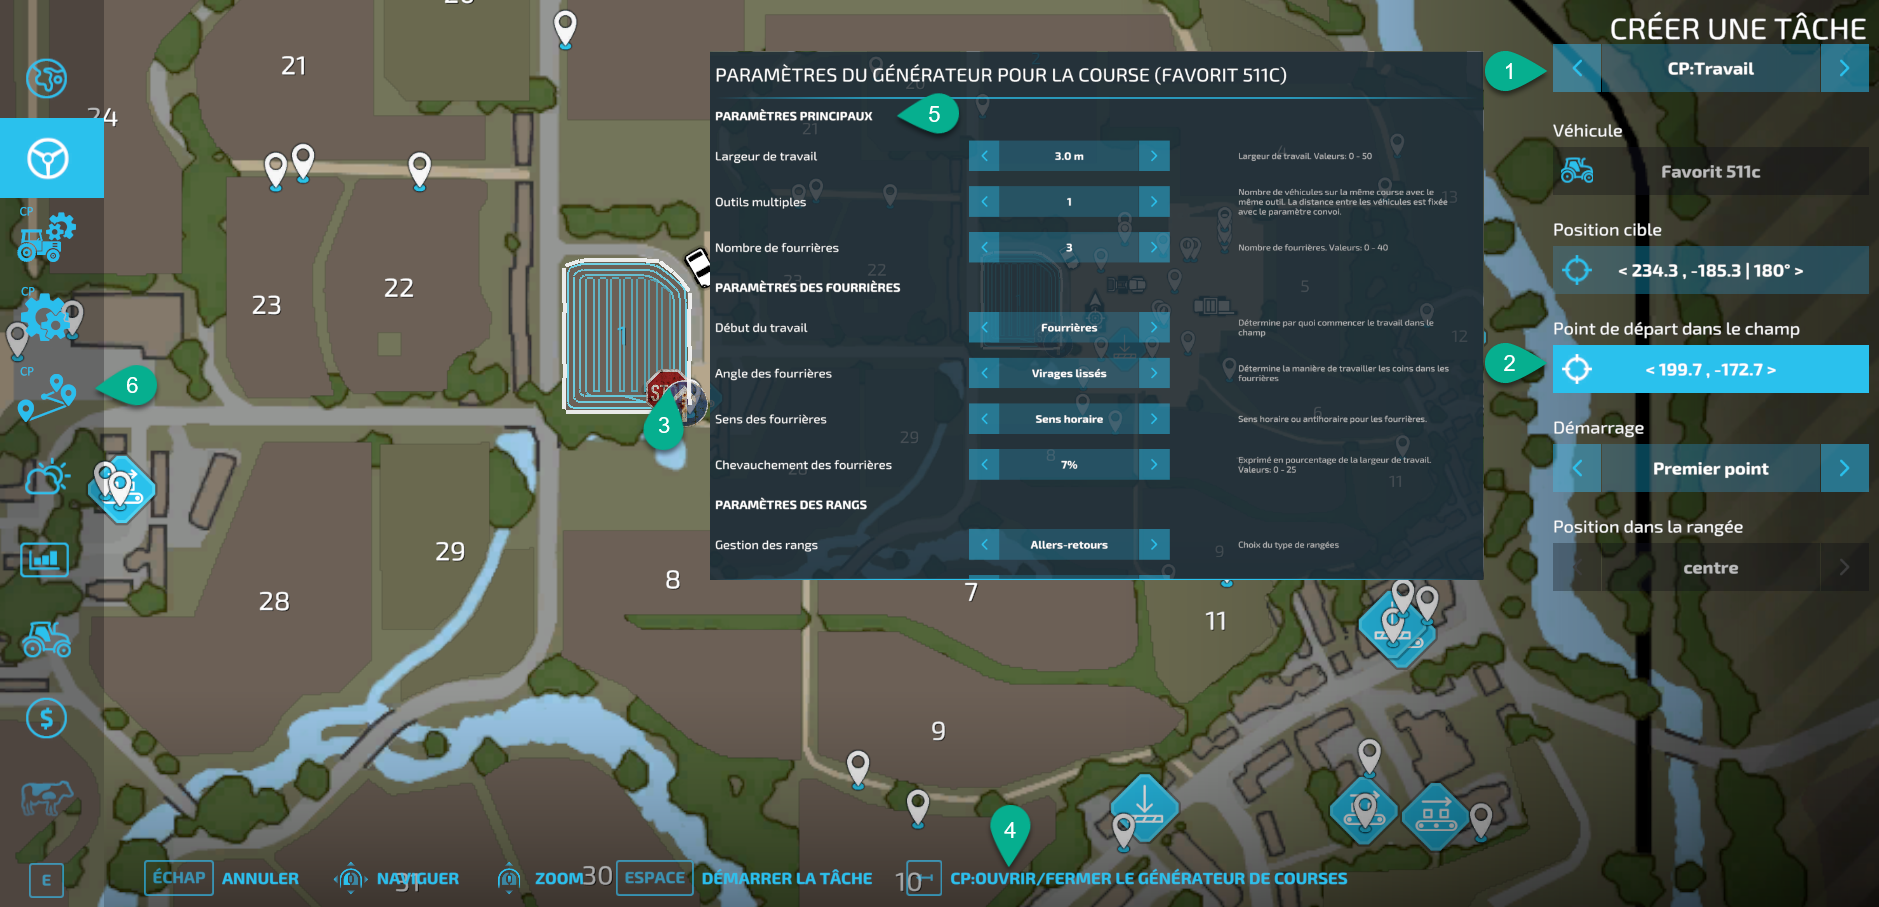
1.From the worker menu, choose task creation CP:Work.
2.Position the start of the race in the desired field by pointing the cursor in the field and clicking.
3.Left click to place the starting point in the field.
4.Open the race generator.
5.Choose your settings for field work.
6.Open the race manager to save it in a folder.
Setting up the Autodrive (AD) unloading route
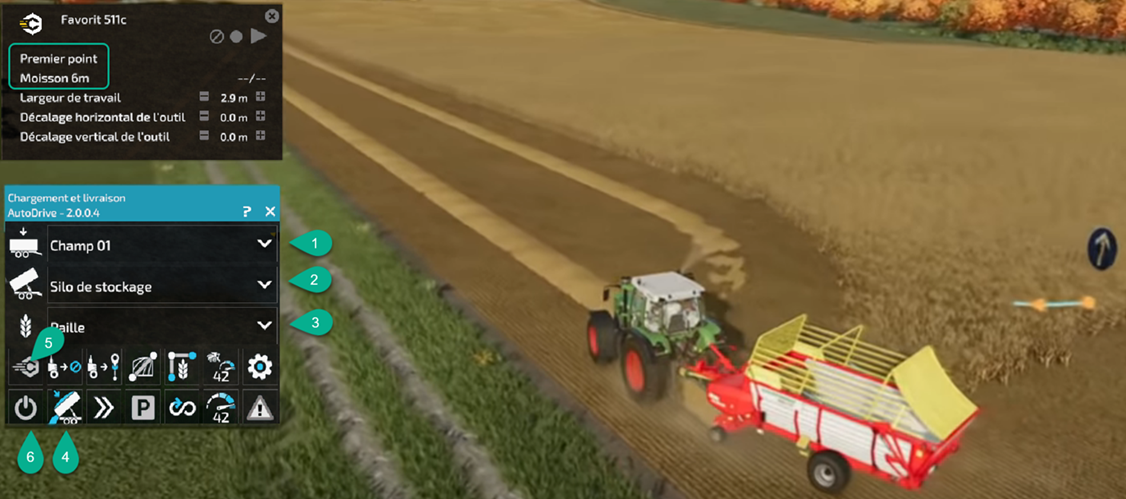
1.Choice of the field where the driver will have to go.
2. Choice of the destination where to go to unload.
3. Choice of the goods to be loaded.
4.Loading and delivery mode.
5.Activation of dialogue with the CP. When AD arrives at the desired field, it will pass the baton to CP. When the autoloader is full, CP will hand over to AD to make the trip to the unloading point.
6.Starting the trip with AD. In the example above, load the same CP stroke as the combine and start at the first stitch.
4. Loading (refuelling)
This mode is very similar to the Load and Deliver mode described earlier, with a few exceptions. It ignores the loop counter and will not offload once it arrives at the target destination.
Instead, the driver stops and deactivates AutoDrive. This mode is intended to be used as a refueling mode for field work. Thus, seed drills or sprayers can be used in the field and, when empty, sent to a filling point. Once filled, they return to their target destination (the field where they started their work).
This mode can also be used in conjunction with Courseplay. All you need to do is have a loaded courseplay run and activate communication with the autodrive for the two mods to work together.
4.1 Coupling with courseplay (CP)
There are two steps to perform in the order you want so that your driver can work in a field following the courseplay and then can go to recharge following an Autodrive route and return to the field to continue his work.
Creation or loading of the CP race in the field
1.From the worker menu, choose task creation CP:Work.
2.Position the start of the race in the desired field by pointing the cursor in the field and clicking.
3.Left click to place the starting point in the field.
4.Open the race generator.
5.Choose your settings for field work.
6.Open the race manager to save it in a folder.
Autodrive (AD) refueling setup

1.Choice of the field where the driver will have to go.
2.Choice of the destination where to go to refuel.
3. Choice of the goods to be loaded.
4.Charging mode only.
5.Activation of dialogue with the CP. When AD arrives at the desired field, it will pass the baton to CP.
6.Starting the trip with AD.
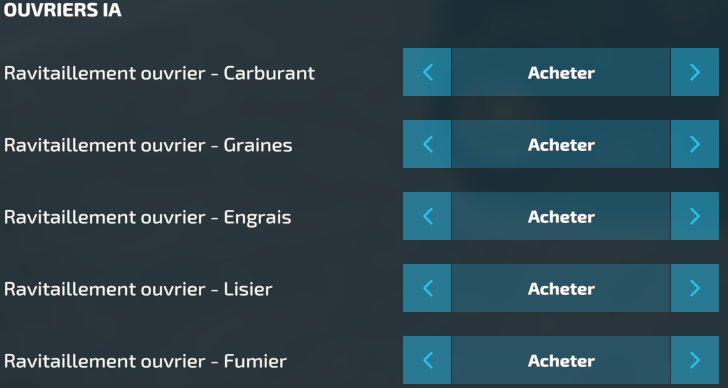
Disable automatic purchase by workers
For this to work, remember to disable automatic purchases by workers.

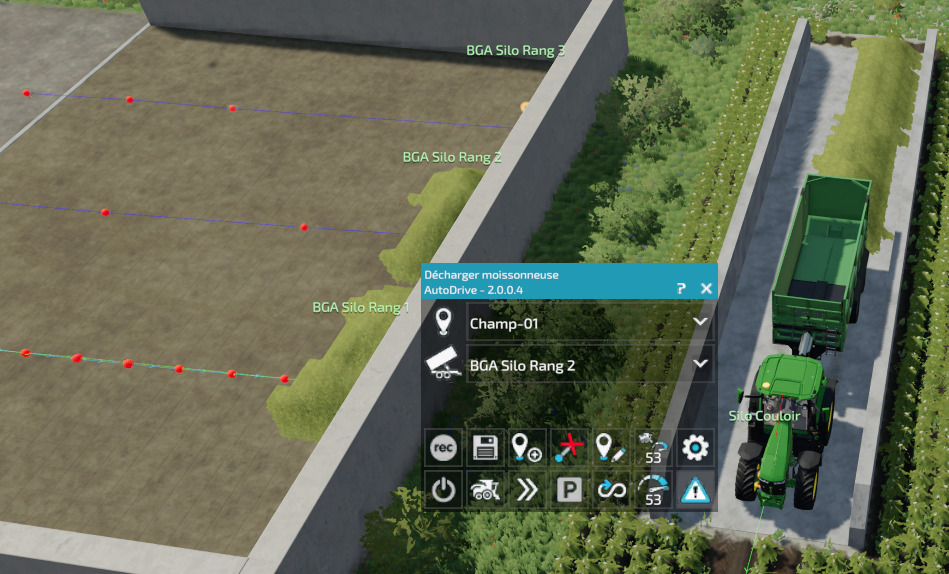
5. Unloading the combine/forage harvester 
In this mode, need to set two destinations. The first must be a field location from where an active harvester can be reached. The second is an unloading destination.
This is the first mode in which AutoDrive drivers are allowed to leave the recorded path and drive into the field.
This mode is quite complicated and involves many adjustments in the settings menu.
5.1 Basic principles
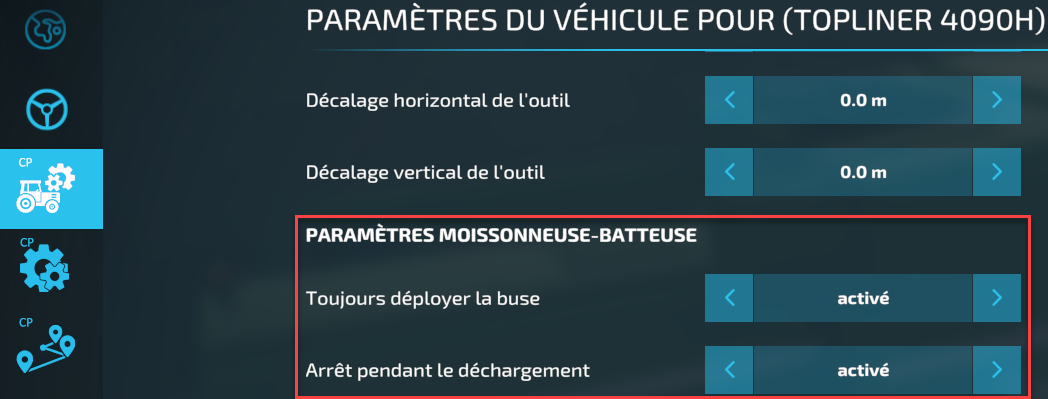
When starting, the driver decides whether to go to the field or unload first (see Loading and delivery). When it reaches the field location, it reports itself as available. When a combine is 100% full and has its chute deployed, it automatically cycles through the drivers flagged as available waiting at the destination point in the field and chooses the one closest to it. Only drivers with the same destination as the combine harvester are accepted. It is therefore important that your harvester and your drivers are on the same field destination in the Autodrive HUD.

Important : It is not necessary to activate the AutoDrive for the harvester. You just need to make sure that she has the same destination point selected as the other waiting drivers.
In the example opposite, the harvester will only call drivers waiting at the destination point of Field 01. There is also an error message to indicate that there are currently no drivers waiting at the destination point. field 01.
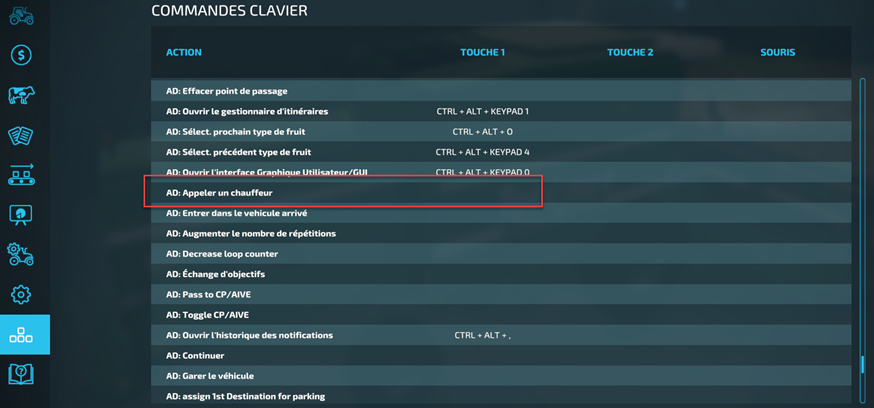
You can also call a driver manually when driving the harvester yourself by assigning the "Call a Driver" hotkey in the game options. If the harvester is controlled by the Courseplay, the AutoDrive driver will automatically come when the harvester has deployed its unloading chute. It is imperative to activate this option in the courseplay.
When the driver is called by a harvester, he plans a path to get under the chute of this one. The driver will consider collisions, crop avoidance, field boundaries and slope. Always ensure that the space in front of the driver is obstacle-free (and free of crops) and that the path to the harvester chute is also collision-free (e.g. no trees or crops directly behind the harvester) .
When the driver reaches the harvester, he checks whether the unloading process is complete or whether the current trailer is full. In the case of multiple trailers, the driver moves forward until he detects an unloading of the combine into the next trailer. When unloading is complete, the driver begins to back up a few meters to allow enough space for the harvester to continue working. Then the driver will wait a few seconds to give the harvester time to leave the area and start planning its return to the starting point. It can also park in the open field (depending on your settings).
Once it arrives at the starting point, it again signals itself as available and waits to be called again. If his trailer is already full, he will drive directly to the unloading destination before returning to the field location.
5.2 Parking in the open field
If the “park in field” option is enabled in the AutoDrive settings, the driver will stay in the field after the combine is unloaded. It will then drive to a park position, and once that point is reached, it will report itself as available again.
5.3 Restrict to field
If this option is activated in the settings, the available path search will be reduced to the field in which the vehicle is located. This option should allow the driver to stay in the field, especially during cornering maneuvers. Important: If no crop-free path can be calculated within the given time (see settings), the path calculator switches to fallback mode and ignores crop overwriting and field boundaries!
5.4 Crop avoidance
Ask the path calculator to avoid crops as much as possible. Important: If no crop-free path can be calculated within the given time (see settings), the path calculator switches to fallback mode and ignores crop overwriting and field boundaries!
5.5 Early calling / Unloading in motion
These options can be used to call a driver in advance beyond a harvester filling threshold or unload the harvester when it is moving (active unloading).
When the harvester reaches the set filling level (pre-call level), it already calls the driver to his current location. During his approach to the harvester, the driver detects if the chute of the harvester is deployed. As soon as the chute is deployed, the driver calculates a path to place the trailer just below. When the driver reaches his unloading threshold, he immediately starts planning a path to the selected field exit (see settings). It is therefore recommended to set the level to 100% in this mode to prevent it accidentally cutting the way to the harvester when trying to reach the exit of the field.

These AD options only appear when you are in a harvester.
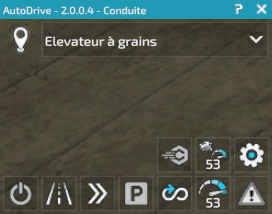
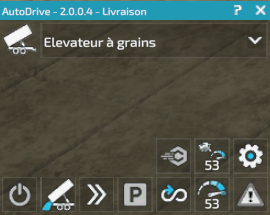
The in-game HUD interface
Once in a vehicle, you will automatically see the Autodrive HUD displayed on the in-game screen. You can show or hide it with the default key combination ALT (left) + 0 (from the keypad). digital). To interact with it, a middle click of your mouse will bring up the cursor, another click will make it disappear. The HUD can be moved by remaining pressed on the left click at the level of its title at the top left.
There are several variations of HUD depending on your preferences and what you are looking to perform.
The classic HUD
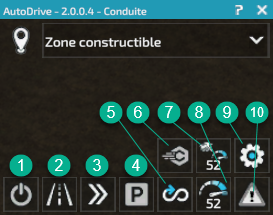
- Enable/Disable AD
- Choice of AD mode (left click for next mode, right click for previous mode)
- Resume trip
- Join the saved parking lot (right click to save the active point as a parking lot)
- Loop counter. Allows you to choose the repetition of the path (left click for the next quantity, right click for the previous quantity)
- Communication with Courseplay (CP)
- Max speed in the field (left click to increase, right click to decrease, wheel for more direct control)
- Max road speed (left click to increase, right click to decrease, wheel for more direct control)
- AD Settings
- Activation of edit mode (right click for display of lines only). Mandatory to display the edit mode specific ATH and thus be able to perform destination registrations, modifications or creations and point manipulations.
Advanced HUD
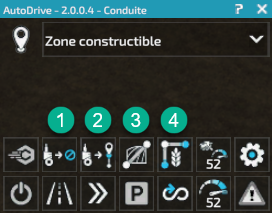
1. Management of the loading and delivery cycle
 No cycling, default mode.
 Cycling among all loading points present in the same folder (does not work in the default folder). Example: You have two silos on the farm and you want to empty them equally. If they are in the same folder, the driver will first load to the first then to the second and again to the first and so on. The driver will do this as many times as indicated in your loop counter (see standard HUD, button 5).
 Cycling among all the delivery points present in the same folder (does not work in the default folder). Example: You want to supply several points of sale or even several corridors of a large bunker silo. If they are in the same file, the driver will first unload at the first then at the second then again at the first and so on. The driver will do this as many times as indicated in your loop counter (see standard HUD, button 5).
 Cycle among all loading and delivery points present in the same folder (does not work in the default folder). Example: You have several loading points and You wish to supply several points of sale or even several lanes of a large bunker silo. You must have a folder for loading points and a folder for delivery points. Thus, the driver will load at point A of the loading points folder then unload at point A of the delivery points folder, and so on. The driver will do this as many times as indicated in your loop counter (see standard HUD, button 5).
2. Field exit
Determines the behavior of the driver when he is in the open field and must leave it to go, for example, to unload his tipper.
 The driver returns to the destination point of the field and then continues its journey or waits for a next call (if it is not yet full for example).
 The driver returns to the 3rd point behind the destination point of the field and then continues its journey or waits for a next call (if it is not yet full for example). This mode is useful if you have a lot of drivers waiting at the destination point of the field. Thus, the driver returning from the field will position himself behind the queue of waiting drivers.
 The driver detects the closest point to exit the field to then continue its journey or return on hold to the destination point of the field if it is not yet sufficiently filled. This mode is recommended if you have drawn a complete route around the field to provide an exit route easily accessible by drivers regardless of their position in the field. Another example, the field is surrounded by fences or colliding vegetation and you want to give drivers a precise route out of the field.
3. Searching for trajectories in the open field
Determines how the driver will behave when looking for a possible path into and from the field.
 The driver is allowed to cut across the field and is not restricted to finding paths inside the field.
 The driver is limited to finding possible paths only in the field.
4. Crop Avoidance
Determines whether the search for possible paths in the field should take cultures into account or not.
 Cultivation will be avoided where possible.
 The trajectory will not take cultures into account. This mode activates automatically if no trajectory is found after a certain period of time when crop avoidance is activated.
Extended (wide) HUD
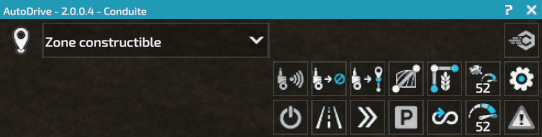
Increase the width of the HUD to have more room to display the list of possible destinations. This option affects all HUDs (Standard, Advanced and Edition).
HUD in edit mode
This mode is essential to carry out all manipulation, creation, deletion, editing and recording operations of points and destinations.

- Starts recording a trip.
Left click to start recording a one-way street.
Right click to start recording a two-way lane.
Left SHIFT + Left Click to start recording a one-way side track.
Left SHIFT + Right Click to start recording a two-way sub-channel.
- Open the route manager to allow import and export of routes.
- Transform the active point (the one pointed by your vehicle) into a destination point.
- Delete the active point (the one pointed by your vehicle).
- Rename the destination currently selected in the list.
The different types of routes
To help you understand the different scenarios in a road network depending on the space constraints on the road or the more or less easy access to certain places, AD allows you to use several types of routes that will be materialized by line colors.
When you enter one or more destinations, Autodrive will always look for the shortest route to get there. This is why it is important to have a well-connected network with a judicious choice of priority, secondary, one-way or two-way sections.
| line color | Keyboard shortcut and usage | Usage |
Green – One way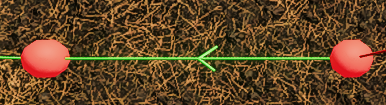 |
To record the trip from a vehicle in edit mode + + |
The most common lane and the one to recommend when you have enough width on the road to make two lanes (each in one direction). |
Blue – Double direction and priority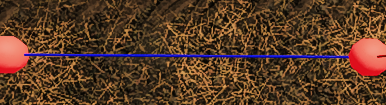 |
To record the trip from a vehicle in edit mode + + |
This channel can be used in both directions. Convenient when the road is narrow and would not allow two green lanes to be laid. You have been warned! : this lane only supports one vehicle at a time (unless they are all going in the same direction). So if you make your entire network in blue lanes, as soon as a vehicle uses it, the others will have to wait for it to leave the network to use it. |
Turquoise – Reverse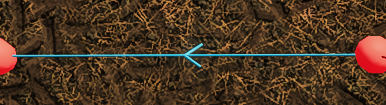 |
To record the trip from a vehicle in edit mode and in reverse+ |
To force the vehicle to reverse (for a parking lot or a silo for example). |
Orange – One-way secondary |
To record the trip from a vehicle in edit mode Left-footed ++ Left-footed ++ |
The worker will only take this route if necessary and only if it is the only way to reach the desired destination. Very practical to avoid that all the workers pass in the stall for example because it is a shortcut. |
Brown – Two-way secondary |
To record the trip from a vehicle in edit modeLeft-footed ++ |
Same as the orange lane except that it allows the double direction. |
There is also the possibility of managing the points directly with the mouse without having to use a vehicle each time to make recordings.
Here are shortcuts needed to manipulate points and create routes with the mouse:
| Action | Keyboard shortcut |
| Create a point | |
| Automatically connect to green lane during creation | Same as for the creation of point except that it is necessary to maintain the key |
| Creation of a green line | |
| Creation of a blue line (of an already green track) | |
| Creating an orange line | |
| Creation of a brown line (of an already orange track) | |
| Creating a turquoise line (backwards) | |
| Deleting a point | Maintain |
| Moving a point | maintain about to move |
Ready-to-use Autodrive networks
To allow you to immediately benefit from already well-built networks that will allow you to directly use Autodrive, we have identified (with their agreement) the best networks available for cards.
Here are some sites where you can grab quality Autodrive networks for your favorite cards:

Many networks available by this big Autdrive fan to the point of having dedicated a complete Youtube channel to it |

One of the best German Autodrive specialists. Very often the best networks you can find on the net are at home. |
The official Autodrive discord where you will find a room where the networks of the most famous cards are posted |
Procedure for installing a pre-built network
You must have activated the Autodrive mod on your game before following the instructions below.
The Farming Simulator backup directories can be found in "My Documents" then "My Games" then "FarmingSimulator2022". They are all called savegame1 for your slot 1 game, savegame2 for your slot 2 game and so on.
Below, the XML file is encapsulated in a ZIP file. You need to extract the XML file then copy it to your save folder. This ZIP file is not a mod, so you don't have to copy it to your mods folder.
| Map and download | Credits and remarks |
Upper Beyleron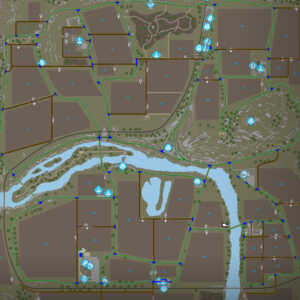 |
Created: Willi Willswissen (Member of AD testers) Translation and adaptation: Lactic68 |
elm creek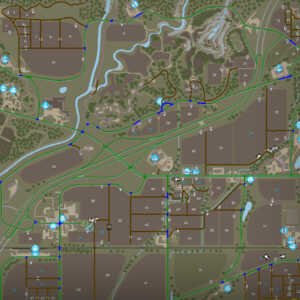 |
Created: Willi Willswissen (Member of AD testers) Translation and adaptation: Lactic68 |
Erlengrat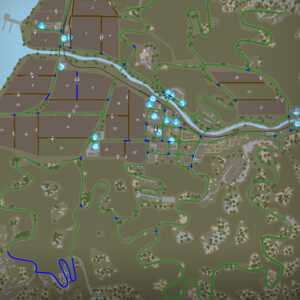 |
Created: Willi Willswissen (Member of AD testers) Translation and adaptation: Lactic68 |
Calmsden Farm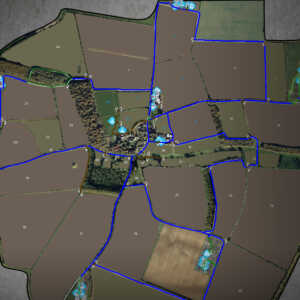 |
Created: Autodrive Guy Translation and adaptation: Lactic68 |
The Old Stream Farm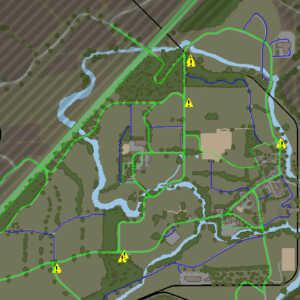 |
Created: elMatador (AD Expert) Translation and adaptation: Lactic68 |
Resources to go further
Video tutorials
- Sam Kummer's Famous Tutorials Courseplay and Autodrive specialist for many years (link to his blog)
- Mr Mods tutorials from the chain of Swiss_Jim who is a fan of Autodrive
Wiki, forum and discord
- The French-speaking Wiki Autodrive managed by Lactic68
- The official discord Autodrive (English and German only)
- Sam Kummer's discord in French
- Swiss_Jim's discord with an AutoDrive breakdown salon hosted by Mr Mods
For a complete automation of your activities
Footnotes
Since the announcement by the Courseplay developers that they will rely on Autodrive for all activities other than field work, this mod will now become essential if you want to completely automate the synchronized management of transport (including to bunker silos). Admittedly, the mod may seem intimidating at first, but once your first routes are well built, you will take great pleasure in watching the ballet of perfectly synchronized workers.