Wopster has just given us a nice Christmas present before its time by making available its now unavoidable GPS mod in Farming Simulator 22. In the program, little change compared to the version available on FS19 except the possibility of saving its settings by firm (practical in multi to avoid a long mixed list). As usual, this is a script and therefore only available for PC / MAC.
For those new to GPS, this is a mod that will help you maintain precise direction when working in the field. The idea is to make nice rows the width of your tool and string them together on each round trip to cover the entire surface of the field efficiently without risking going back to where the work has already been done.

How to equip your vehicles with GPS?
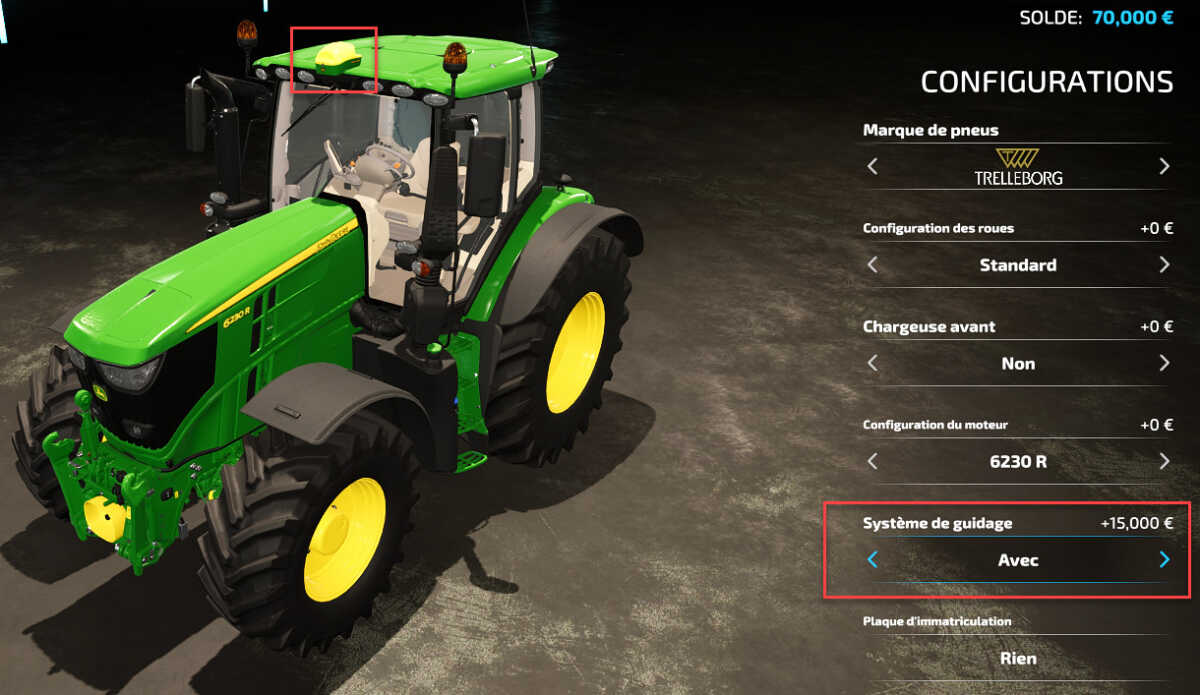
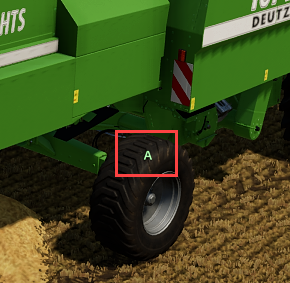
To be able to benefit from the assistance of the GPS in your vehicles, you will first have to go through the dealership box by purchasing the option for € 15. On some vehicles, you will even see the typical dome of the GPS antennas appear on the roof of the cab (Starfire module at John Deere as shown in the photo of the 000R below). The only exception to the rule is that the vehicles are in the “vehicles” category, which will all be already pre-equipped.
The 3 essential steps to make the GPS work
Step 1: Ignition
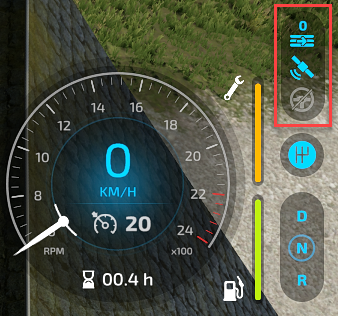 Once at the edge of the field, properly aligned and with your tools attached, turn on the GPS by pressing the key combination ALT + C. You will see the confirmation of satellite reception as well as the row number you are about to work on.
Step 2: Choose the working width
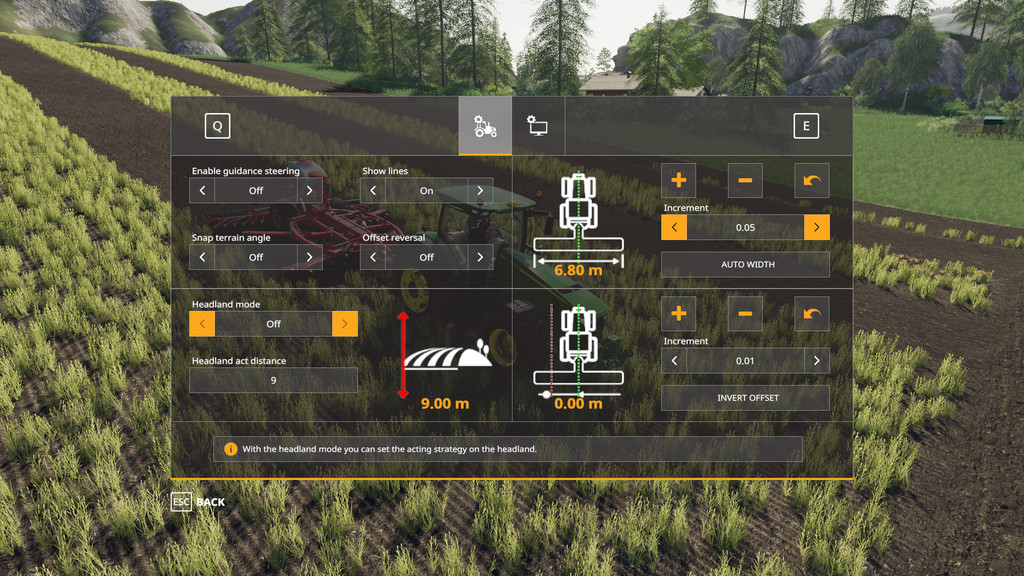
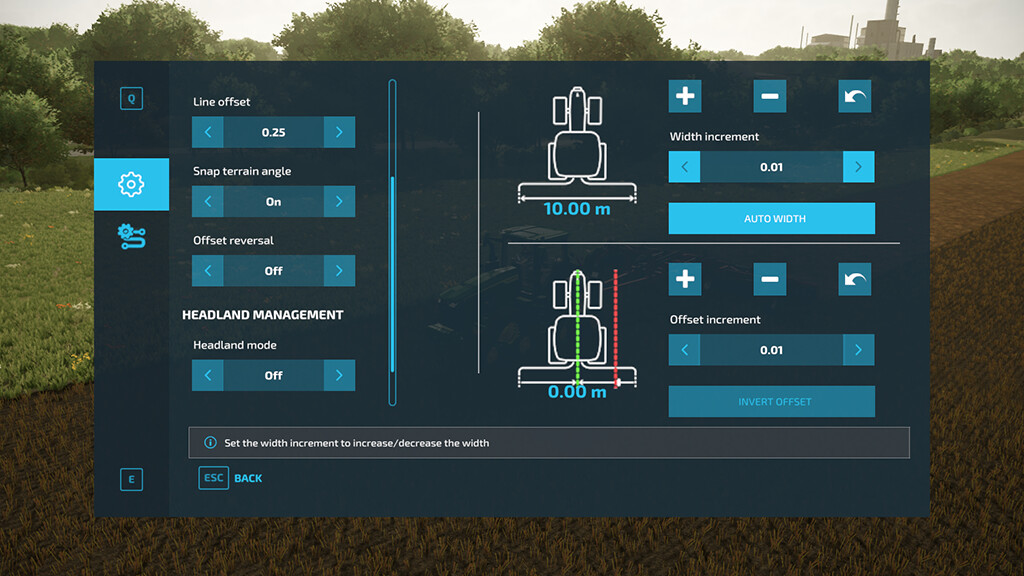
To determine the width of your tool and therefore of your row, go to the graphical interface of the GPS by pressing CTRL + S then click on the "automatic working width" button to automatically detect the working width of your tool or cutter bar. Obviously, don't forget to hitch up your tools beforehand. In some cases, it will not correctly detect the width and you will have to enter it manually using the + and - buttons just above. You can also change the increment expressed in meters by selecting the working width precision. If for example you choose "1", each time you click on "+", it will add 1 meter.
Step 3: Determine the orientation
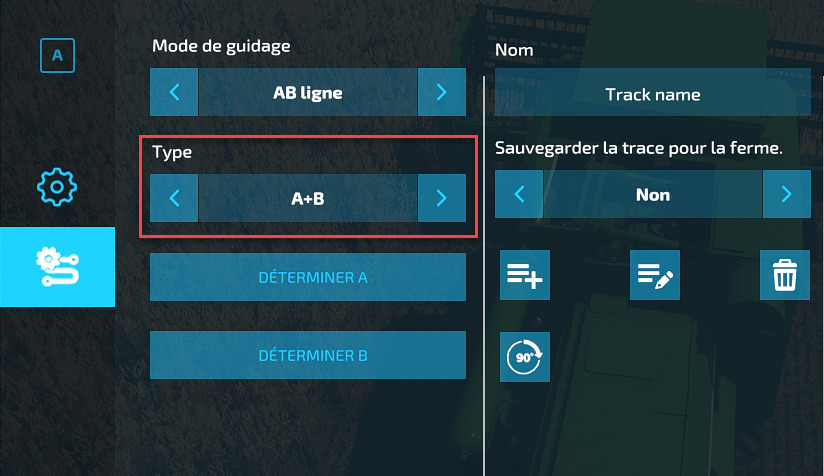
To determine the orientation of your guidance, ideally along the length of the field, you have two options that you will find by pressing CTRL + S and going to the second tab on the left (the cogwheel and the coil) . The guidance mode will necessarily be AB line type.
- A + B : This mode is the default one and it will ask you to drive a few meters with your vehicle to draw the line that the GPS will use as a reference
- A + Heading : This mode will ask you to enter a heading expressed in degrees by pressing the button just below "Determine A".
 - In A + B mode, you will have to roll a few meters from your point of origin named A to a point named B: press ALT + E and start rolling a few meters in the right direction, press ALT + E again and you will see appearing the letter A superimposed. Continue for at least 15 meters and press ALT + E one last time to fix point B. Now the GPS is fully set for this field.
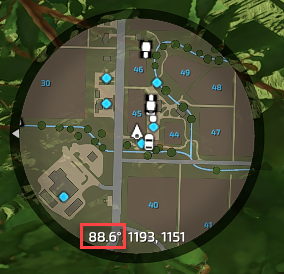
- In A + Heading mode, you will have to declare a heading (expressed in degrees, like an angle): you will have to enter the angle that appears in your minimap at the bottom left. In the example opposite, you can easily round 88.6 ° to 90 °, especially since the GPS will not accept decimals.
Here you are, you are now ready to activate the automatic GPS guidance by pressing ALT + X. You will hear a confirmation beep and the center line will turn green. You can let go of the steering wheel and concentrate on speed and why not engage the cruise control. In addition, if you have set the headland mode to "stop", your vehicle will stop by itself while respecting the stopping distance that you have indicated just below.
The automatic guidance will automatically disengage as soon as you touch the steering to replace you in the next row, for example. You will then have to engage it again by pressing ALT + X.
To go even further
In the first tab of the mod's GUI:
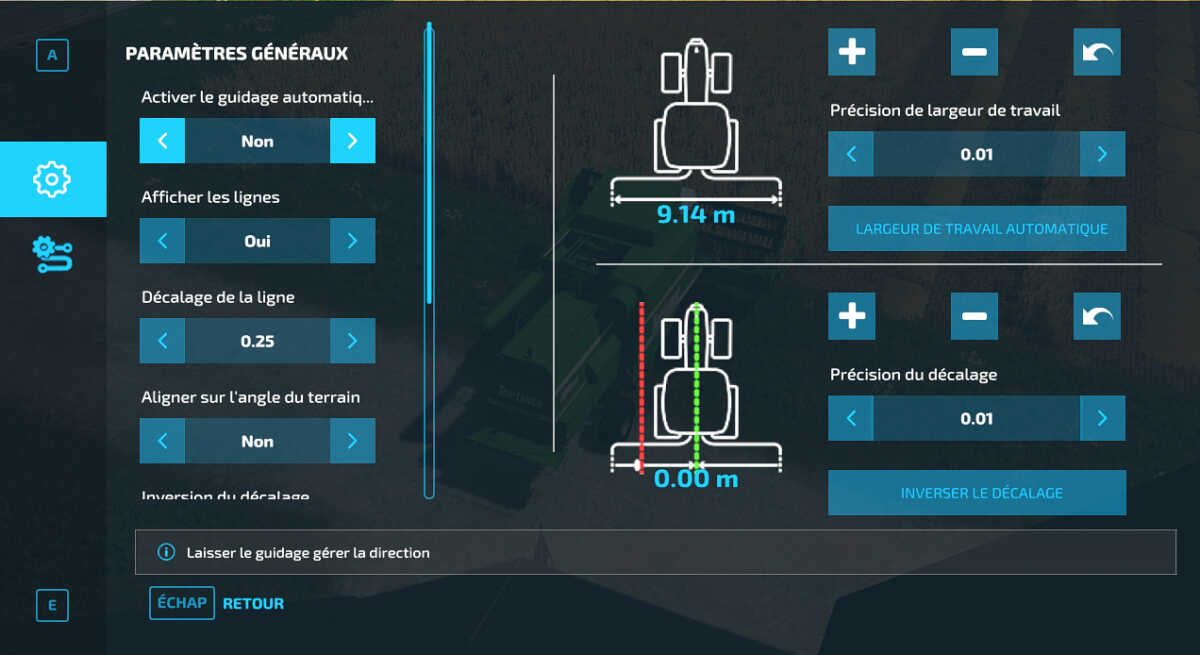
- Activate auto guidance : is the same as the shortcut ALT + X to activate / deactivate automatic guidance.
- Show lines : show or hide the lines on the ground. Can also be used with the shortcut ALT + L.
- Line offset : allows you to choose the display height of the lines, useful when you are in a field with tall crops.
- Align with the angle of the land : can only be used when you are in orientation A + B mode. Your line will try to follow the angle of the ground while being automatically parallel, just to correct any misbehavior.
- Offset reversal : allows you to automatically reverse the offset of the next line, when you turn around. Useful with plows that you have to turn in each row.
- Impound mode : Stop or Off depending on whether you want your vehicle to stop automatically or not at the end of the line.
- Stopping distance : expressed in meters, indicates the distance from the edge of the field where you want the vehicle to stop.
- Working width : allows you to specify the width of your row either manually or with the automatic detection button.
- shift : allows you to calibrate the width of the offset between your midpoint of the vehicle and the row that will actually be worked, for example with plows where the row worked is not centered
In the second tab of the mod's GUI:
- Guidance mode : For the moment necessarily of type AB line
- Type : either A + B or A + angle to define the orientation of your line
- Name : The name of your recording if you want to keep your settings
- Save the track for the farm : Yes yes no, useful if you do not want to pollute the list of other players from other farms in multi
- The 4 icons : create a new recording, save the current settings in the selected recording, delete the recording, rotate the lines by 90 ° (also possible with the shortcut ALT + End)
Conclusion and small survey
Once you have developed a taste for the assistance of a GPS for working in the fields, it is difficult to do without it. The least we can say is that the Wopster GPS was expected by the entire PC / MAC community to finally simplify life and gain in efficiency in the daily tasks of field maintenance. As in real life, the mod pushes the realism to the point of forcing you to buy the option in the vehicle or vehicles where you would like to benefit from it. You can then save your settings for each tool so that you can quickly recall them and save time.